Crucial Benefits of CSRF Tokens in Web Security

Cross-Site Request Forgery (CSRF) is a security vulnerability that poses a significant threat to web applications. CSRF attacks occur when an attacker tricks a user’s browser into making an unintentional and unauthorized request on behalf of the user.

To mitigate this risk, web developers often employ CSRF tokens as a fundamental security measure. In this article, we will delve into the benefits of CSRF tokens and how they contribute to enhancing web application security.

  1. Preventing Unauthorized Requests: CSRF tokens serve as a protective barrier against unauthorized requests. By embedding a unique token in each form or request, web applications can verify the legitimacy of the incoming requests. This ensures that only requests originating from the same site and user are processed, preventing attackers from forging requests on behalf of users.
  2. Enhancing User Authentication: CSRF tokens complement user authentication mechanisms. Even if a user is authenticated, an attacker cannot exploit their active session to perform malicious actions without the corresponding CSRF token. This dual-layered security approach fortifies the overall protection of user accounts.
  3. Securing Sensitive Actions: CSRF tokens are particularly crucial when users perform sensitive actions, such as changing passwords, making financial transactions, or modifying account settings. Incorporating CSRF tokens into these processes adds an extra layer of security, ensuring that only intentional and authorized actions are carried out.
  4. Cross-Origin Protection: One of the primary benefits of CSRF tokens is their ability to safeguard against cross-origin attacks. By tying the token to the specific origin of the web application, attackers attempting to forge requests from a different domain are thwarted. This helps maintain the integrity of the web application and prevents unauthorized cross-origin requests.
  5. Preventing Session Hijacking: CSRF tokens play a role in preventing session hijacking attempts. Since these tokens are typically bound to a user’s session, even if an attacker manages to obtain a user’s session identifier, they would still need the corresponding CSRF token to execute malicious actions. This adds an additional layer of complexity for attackers attempting to compromise user sessions.
  6. Compliance with Security Best Practices: CSRF token usage aligns with established security best practices. Many security standards and frameworks, such as OWASP (Open Web Application Security Project), recommend the implementation of CSRF protection mechanisms. Adhering to these guidelines not only helps protect users but also demonstrates a commitment to security excellence.

Conclusion:

In the ever-evolving landscape of web security, CSRF tokens stand out as a robust defense mechanism against unauthorized and malicious activities. By implementing CSRF tokens, web developers can fortify their applications, safeguard user data, and provide a secure online experience. As cyber threats continue to evolve, the proactive integration of CSRF tokens remains a crucial element in the ongoing effort to enhance web application security.

Understanding Environment Variables in Python: Creating, Activating, and Deactivating

In the world of programming, managing configurations and sensitive data is a crucial aspect of developing secure and adaptable applications. Python, as a versatile and widely-used programming language, offers several ways to handle environment-specific settings and secrets. One of the most common and recommended methods is through the use of environment variables. In this blog post, we’ll explore what environment variables are, how to create them, how to activate and deactivate them within your Python projects, and even how to create them programmatically using Python.

What Are Environment Variables?

Environment variables are a way to store configuration settings, secrets, and other runtime parameters outside of your Python code. They are stored in the operating system’s environment and can be accessed by programs and scripts to configure their behavior. This approach provides several advantages:

  1. Security: Sensitive information like API keys, passwords, and access tokens should never be hard-coded in your code. Environment variables keep such data separate from your source code, reducing the risk of exposure.
  2. Portability: By using environment variables, you can develop your Python applications on one machine and deploy them on another without worrying about hardcoded settings that may differ between environments.
  3. Flexibility: Environment variables allow you to change the configuration of your application without modifying the code. This is especially useful for applications that need to be configured differently in different environments (e.g., development, testing, production).

Creating Environment Variables

Creating environment variables can be done manually as described in the previous section. However, you can also create them programmatically using Python.

To create an environment variable using Python, you can use the os module. Here’s how you can do it:

In this code, we import the os module, define the name and value of the environment variable, and then set it using os.environ. Finally, we verify that the variable has been set correctly by using os.environ.get.

Another way: python -m venv MYVARIABLE

Activating Environment Variables in Python

Once you’ve created your environment variables, you can access them in your Python code using the os module, as shown in the previous section.

Here’s a reminder of how to access an environment variable in Python:

Another way: MYVARIABLE/scripts/activate

Deactivating Environment Variables

Deactivating environment variables is simply a matter of removing or resetting their values. To remove an environment variable, you can do it programmatically in Python as well:

In this code, we use del os.environ[variable_name] to remove the environment variable if it exists.

Another way: deactivate

Conclusion

Environment variables are a fundamental tool for managing configuration settings and secrets in your Python projects. They offer security, portability, and flexibility, making them a preferred choice for handling sensitive data and runtime parameters. By following the steps outlined in this blog post, you can create, activate, and deactivate environment variables in Python, including programmatically creating and removing them as needed. This knowledge will help you build robust and adaptable applications while maintaining the security of your sensitive data.

What is XSS and how many different categories are there?

Cross-site scripting (XSS) attacks are a type of web vulnerability that allows an attacker to inject malicious code into a website, which is then executed in the user’s browser. This can lead to a variety of malicious activities, including stealing sensitive user data, session hijacking, and even spreading malware.

There are several different types of XSS attacks that attackers can use to exploit web vulnerabilities, each with its own unique characteristics and potential for harm. In this article, we’ll closely examine some of the most common types of XSS attacks and how they work.

Reflected XSS

Reflected XSS attacks occur when an attacker injects malicious code into a URL or other input field that is then reflected back to the user’s browser as part of the website’s response. This type of attack is often used to steal sensitive user data, such as login credentials or personal information, by tricking users into entering their information into a fake login form.

Stored XSS

Stored XSS attacks occur when an attacker injects malicious code into a website’s database, which is then served to all users who access the affected page. This type of attack can be particularly dangerous because it can remain undetected for long periods of time, potentially allowing the attacker to collect large amounts of sensitive user data.

DOM-based XSS

DOM-based XSS attacks occur when an attacker injects malicious code into a website’s Document Object Model (DOM), which is then executed by the user’s browser. This type of attack can be particularly difficult to detect and prevent because it does not involve any interaction with the website’s server.

Blind XSS

Blind XSS attacks occur when an attacker can inject malicious code into a website, but the attack is not immediately visible to the user. This can happen when the attacker can inject the code into a hidden or obscure part of the website, or when the attack is triggered by a specific user action.

Self-XSS

Self-XSS attacks occur when a user is tricked into injecting malicious code into a website, often by copying and pasting code from a malicious source. This type of attack can be particularly effective because it relies on the user’s actions to execute the malicious code.

Preventing XSS Attacks

There are several steps that website owners can take to prevent XSS attacks from occurring. These include:

Validating and sanitizing all user input to ensure it does not contain malicious code.

Implementing Content Security Policy (CSP) headers to prevent the execution of any code that does not originate from trusted sources.

Using HTTPS encryption to protect user data in transit.

Keep all website software and plugins up-to-date to ensure known vulnerabilities are patched as soon as possible.

Conclusion

XSS attacks are a serious threat to website security, and website owners should take steps to protect themselves and their users from these attacks. By understanding the different types of XSS attacks and implementing effective security measures, website owners can help to prevent these attacks from occurring and keep their users safe.

Is cybersecurity affordable for everyone?

Cybersecurity is essential for everyone, not just big corporations. While it is true that large organizations may have more resources and a greater need to protect their sensitive data, individuals also have important information that they need to protect. This can include personal or financial information, passwords, and other sensitive data that could be compromised if not properly secured.

Everyone must take responsibility for protecting themselves online, whether a large corporation or an individual. Some best practices are using strong passwords, Multifactor authentication (MFA), avoiding reusing the password on different platforms, being cautious when clicking on links or downloading files, and keeping software and devices up to date with the latest security patches.

We must protect the information and data because it has value, whether financial or social. In most cases, being proactive and protecting those assets is cheaper than the repercussions that we can have when that information is stolen.

What about the cost? The price to protect the organizations’ assets has grown exponentially in the last 25 years. Now it’s much more expensive to protect all the company’s information because the attacks are more sophisticated.


The bad actors are using more advanced tools, techniques, and technology. As a result, organizations need to acquire more security devices, applications, and solutions to be protected. In addition to all of this, there should be a commitment to educate and train all employees and end users.

Organizations, to maintain safe their information, need to get some of the below solutions:

Firewall
Mail security
AV
Intrusion detection system
Centralized logging
Security incident and event monitoring (SIEM).
Thread intelligence feed
Managed security service provider contract
Penetration tester
Automatization
Machine Learning AI

With all of these resources, you need to increase the prices for your product or service to continue profitably. And the consumer will be paying for all them.

Even though those applications and solutions are the latest on the market, They are not something like set-and-forget kind of solution.

But wait a minute! For medium and large corporations. They have an assigned budget for all of these solutions., Nonetheless, where are all the others? A small. Business. Such as public schools. Nonprofits. Human service organizations. Smaller cities. And county governments. Community associations. Many of all these. Organizations they can’t afford. An infosec solution.

The challenge is how we can guarantee access to cybersecurity and make it available for everyone.

Thanks for reading.

Microsoft Teams network assessment tool

If you are in the process of migrating from Skype for Business to Microsoft Teams for the first time, in that case, always is a best practice to execute the network assessment tool to identify any possible bottleneck in your internal network.

Sometimes, even when you have excellent network switches, the problem can be wireless clients’ access points.
When there is a branch office in the company, because they don’t have the same infrastructure as in the headquarter, this kind of tool will help you identify possible network problems before implementing Microsoft Teams.

Suppose you are already using Microsoft Teams, and you have bad quality in either voice or video. In that case, this tool is a good resource to identify what device or configuration is causing these failures.
When I say failures in your network, maybe it is just the quality of service configuration or adjustments that will allow using the same network. Still, with some improvements for the voice or video, in the same way, you will find some delays in your network or jitters, but again, if you don’t have this kind of tools, it will be hard to be 100% sure about what is going on in your internal network.

For all the messaging administrators that were using the same tool but for the Sky for business, this new version is exclusively for Microsoft Teams.

You can get that tool from this link Download Microsoft Teams Network Assessment Tool from Official Microsoft Download Center, download and install it on a computer.

Accept the license terms and click on Install
The progress bar will appears and also another window to install the program
Click on Next
Be careful of the path, you will need this information later
Click install and this is the last step.
Using a windows explorer, go to the installation path and double click on NetworkAssessmentTool.exe
You will see the tool validating the ports, IP’s to start the performance check.

Where you can see the results?

Open the file NetworkAssessmentTool.exe.config and you will find these configuration, you can modify if needed.

  <!-- Audio: 50000-50019
       Video: 50020-50039
       VBSS:  50040-50059 -->
  <add key="MinimumSourcePort" value="50000"/>
  <add key="MaximumSourcePort" value="50019"/>

  <!-- Duration of media flow for the quality checker, in seconds                               -->
  <!-- Note that Ctrl+C can be pressed at any time to stop the quality check                    -->
  <add key="MediaDuration" value="300"/>

  <!-- File name of where detailed service connectivity check results are stored                -->
  <!-- Directory: %appdata%\..\Local\Microsoft Teams Network Assessment Tool                    -->
  <add key="OutputFileName" value="service_connectivity_check_results.txt"/>

  <!-- File name of where quality check results are stored                                      -->
  <!-- Directory: %appdata%\..\Local\Microsoft Teams Network Assessment Tool                    -->
  <add key="ResultsFileName" value="quality_check_results.csv"/>

Thanks for reading, I hope it helps.

Tony Gonzalez

New feature in M365 to avoid email flow issues

I do remember in the past, when I started having issues with email been rejected, obviously we got a spike on tickets because this problem was affecting the whole company. After checking the NDR (Non-delivery report) and different workarounds, I realize that a certificate for exchange has expired.

There are different approaches to identify whether a certificate is about to expire; in this article https://tonygonzalez0379.com/2020/05/25/how-to-check-certificates-expiration-date-using-powershell, you can find how to use PowerShell to identify proactively if a certificate will expire in a period of time, in my case, I use 30 days in advance, so this script is being executed on weekends. You have plenty of time to renew the certificate before you significantly impact all end users.

Another common issue that affects the email flow is when a domain name is about to expire; sometimes, we get a domain name only for a year, and then when this domain expires, Exchange can’t continue delivering email to those users that contain the specific domain in the email address.

It is common that a user has different SMTP addresses, because those accounts need to receive emails using other domains, the same approach as the certificate, you could create a PowerShell script to validate the expiration date using The Who is information for those domains.

The good news is that Microsoft 365 now has a solution that can help the administrators to proactively identify if a certificate or domain name that is part of the registered domains in M365 is about to expire; this feature is new, and you will be able to see this notification in the insight area.

Also, the administrator will receive an email with this notification. I believe that this is great for all the messaging administrators in the company, because if you are not proactive, there is a high risk of having a problem like everyone can’t send or receive emails, and the business impact could be huge.

Below you can see an example of the domain expiration. You can find this in the exchange ministration console on Office 365, in the inside tab. In the same way, you will find the information about the certificates here. Nonetheless, it is better to have a solution like PowerShell, this is the old school, and pretty much all the Administrators are familiar with this process.

Here you can see the domains that will expire soon

Thanks for reading.

Tony Gonzalez

The new Microsoft 365 defender and security center

I was researching the ATP policies in Office 365 when I saw a message about the new features in Office 365 defender, as sometimes it happens when you start reading about a specific topic. You find different links to other various topics, and at the end, you finish reading about something different as you started. This is the case.

I would like to mention some benefits that Microsoft 365 security center and Microsoft 365 defender have to protect the information that is hosted in your M365 tenant.

The new M365 security center it’s similar to having a SIEM (Security Information and Event Management) because it provides detection, analytics, and response to different events in your organization.

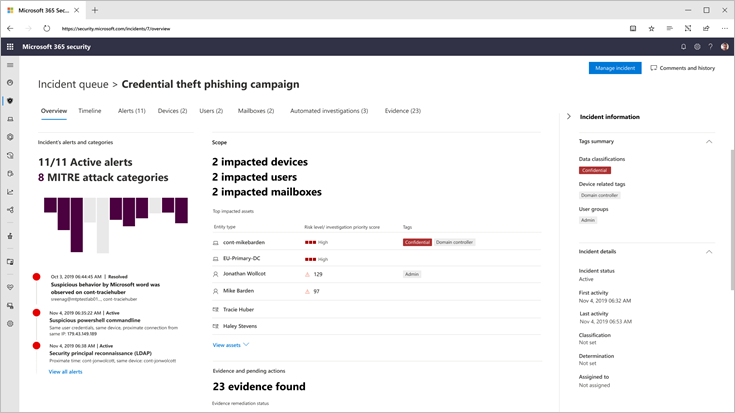
In the Microsoft 365 Security Center, you can get alerts and notifications about incidents regarding security breaches.

Incident dashboard

For example, when a computer is detected sending unusual traffic, using a different port to connect applications, sites, or protocols, or if a mailbox has received malicious content like malware, virus, or phishing.

The security defender solution, besides detecting all of these attacks, also gives some playbooks to mitigate the incident and make sure that the security breach is mitigated.

In the situation where a user receives malware, the incident dashboard contains all the information regarding the computer infected, IP address, location, user details, mailboxes, and the level of the risk.

In our experience as messaging administrators, we know that regardless of all the technologies or systems that we have to identify and block malware, sometimes some emails pass through. Therefore, we need to purge the delivered emails.

Now, Office 365 can identify those emails and delete them from the mailbox, even when they have been delivered; this is known as ZAP (Zero-Hour Auto Purge). Once Office 365 identifies this problem, an alert is triggered, and the alert is correlated with an incident. Therefore, in the dashboard, we can see an investigation related to this event.

Office 365 security can act immediately without any human intervention.

NOTE: It’s important to mention that ZAP does not work in a standalone exchange Online Protection (EOP) environment that protects an On-prem exchange environment.

Report of all emails that were zapped

You can see how many emails have been Zapped, how many mailboxes have been affected, and the status of the purge; that means you can double-check that no one has that malicious email in the mailbox.

In the Microsoft 365 security center, we can see not only the email threats but their kind of alert and their status; meaning, whether that alert has been mitigated or it is in process, and you can drill down to see all details.

Part of the information that contains the alerts, you can see the user name, title, department, computer name, IP address, location, and much more data that is helpful to the administrator to review if the user was trying to log in on different computers that might be at risk.

Details about a user with a high risk score

As you can see from this figure, we could identify how risky a user is. In this example, the user is a high priority to investigate due to all the different events that her account had. Also, we can see all the various activities the user had in previous days or weeks.

Office 365 provides a score where we can quickly identify the top users where you need to take action because they can be compromised.

With the advanced hunting tool, you are able to query different system applications from Office 365 such as Defender for Office 365, Defender for EndPoint, Defender for Identity, Cloud App Security (CAS), ATP, EOP, and then use a query to get information from all this telemetry.

Advance hunting console

The output of these queries can give us more valuable information about an incident. For example, if there is a situation where the user account is compromised, we are talking that these credentials were trying to be stolen. Therefore we can identify if those credentials were used to try to access other computers.

As we know, some attackers start with a typical user and then, they move laterally until they find an admin user that can have access to any domain controller in the network.

After reviewing all the different capabilities that Microsoft Office 365 security provides, the solution can automatically detect anomalies, gathering formation from other Office 365 security products; as I stated before, now Office 365 has a kind of SIEM product where the security team is able to control all the different security incidents.

Alert when credentials were stolen or theft

Furthermore, we can see alerts regarding inbox forwarding rules to external email addresses, this is a common method the attackers use to extract information from users or companies, M365 defender creates an alert to notify the administrator that there is a suspicious rule in a mailbox, and then, a security administrator must take a look at this configuration and start an investigation.

I am stunned that Microsoft now has this kind of solution working towards having a cloud environment more secure.

 There is something that I always tell other skeptical engineers about migrating to the cloud, is that Office 365 and Microsoft Azure provide all the tools to make a secure environment.

 There are many different tools, policies, services, products, and solutions that we can implement to have a secure environment in the cloud. For example, ATP (Azure Threat Protection) policies where we can configure antimalware, Anti-Spam policies, safe attachments, safe links, data loss prevention (DLP), information protection (AIP), cloud application security (CAS), and much more security configurations!

This topic has much more to cover; this is only scratching the surface. I want to continue talking about this in other posts.

Thanks for reading

source: https://docs.microsoft.com/en-us/microsoft-365/security/mtp/microsoft-threat-protection?view=o365-worldwide

coffee_or_beer

Thanks for reading, if this article was helpful or interesting, you can buy me either a coffee or beer.

Buy a coffee or beer to Tony, in that way he will continue working towards new article.

$1.00

How to use open file dialog in PowerShell

When you are working with files sometimes is easier use the open file dialog or select the files.

For example when you use the Import-Csv cmdlet to retrieve data from a csv you can use these lines:

$File = New-Object System.Windows.Forms.OpenFileDialog -Property @{

    InitialDirectory = [Environment]::GetFolderPath(‘Desktop’)

}

$null = $File.ShowDialog()

$FilePath = $File.FileName

Import-Csv $FilePath

Then work with all data in the Csv file.

The most important part of this code is the class System.Windows.Forms.OpenFileDialog that allows create the object $File

I have another post working with .csv files to see how process the records but for now I want to show you this nice feature.

Thanks – Gracias  – Dhanyavaad

How to purge emails

this only apply for exchange on-prem, can be exchange 2010, 2013 or 2016

Search-Mailbox tony@tonyexchange.com -SearchQuery ‘from:”brannon@companyx.net” subject:”December Unpaid Invoice” sent:10/11/2017’ -TargetMailbox “Exch Admin” -TargetFolder “Purged01″ -LogLevel full

The switches –LogLevel full mean that the result of the search will be copied to the folder Purged01 into the mailbox Exch Admin.

If we don’t want to copy put the switches -LogLevel full –logonly and the end of the above command.

Example:

Search-Mailbox tony@tonyexchange.com -SearchQuery ‘from:”brannon@companyx.net” subject:”December Unpaid Invoice” sent:10/11/2017’ -TargetMailbox “Exch Admin” -TargetFolder “Purged01″ -LogLevel full –logonly

If we want to delete the content just put the switch –DeleteContent.

Example:

Search-Mailbox tony@tonyexchange.com -SearchQuery ‘from:”brannon@companyx.net” subject:”December Unpaid Invoice” sent:10/11/2017’ –DeleteContent.

How to get all users in Active directory and Exchange using PowerShell

When we are using Exchange PowerShell and we want to retrieve all mailboxes we can use
Get-mailbox –resultsize unlimited otherwise you will get only 10000 mailboxes.
PS C:\> Get-Mailbox -ResultSize Unlimited
Name    Alias  Database      ProhibitSendQuota   ExternalDirectoryObjectId                
—-    —-   ——-        —————–    ———————
If you want to filter the query you can use
PS C:\> Get-Mailbox | ?{$_.Office -eq ‘US’}
The question mark stands for “where-object” and it’s a way to short the query.
For Active Directory is a quite different, if you want to retrieve all users you have to use
  Get-AdUser –Filter * -Properties *
If you want to filter the query you can use
Get-AdUser –Filter * -Properties Department | where-object {$_.Department –eq “IT”}
In the same way as before, you can use ? also
  Get-AdUser –Filter * -Properties Department | ?{$_.Department –eq “IT”}