I do remember in the past, when I started having issues with email been rejected, obviously we got a spike on tickets because this problem was affecting the whole company. After checking the NDR (Non-delivery report) and different workarounds, I realize that a certificate for exchange has expired.
There are different approaches to identify whether a certificate is about to expire; in this article https://tonygonzalez0379.com/2020/05/25/how-to-check-certificates-expiration-date-using-powershell, you can find how to use PowerShell to identify proactively if a certificate will expire in a period of time, in my case, I use 30 days in advance, so this script is being executed on weekends. You have plenty of time to renew the certificate before you significantly impact all end users.
Another common issue that affects the email flow is when a domain name is about to expire; sometimes, we get a domain name only for a year, and then when this domain expires, Exchange can’t continue delivering email to those users that contain the specific domain in the email address.
It is common that a user has different SMTP addresses, because those accounts need to receive emails using other domains, the same approach as the certificate, you could create a PowerShell script to validate the expiration date using The Who is information for those domains.
The good news is that Microsoft 365 now has a solution that can help the administrators to proactively identify if a certificate or domain name that is part of the registered domains in M365 is about to expire; this feature is new, and you will be able to see this notification in the insight area.
Also, the administrator will receive an email with this notification. I believe that this is great for all the messaging administrators in the company, because if you are not proactive, there is a high risk of having a problem like everyone can’t send or receive emails, and the business impact could be huge.
Below you can see an example of the domain expiration. You can find this in the exchange ministration console on Office 365, in the inside tab. In the same way, you will find the information about the certificates here. Nonetheless, it is better to have a solution like PowerShell, this is the old school, and pretty much all the Administrators are familiar with this process.
Here you can see the domains that will expire soon
I was researching the ATP policies in Office 365 when I saw a message about the new features in Office 365 defender, as sometimes it happens when you start reading about a specific topic. You find different links to other various topics, and at the end, you finish reading about something different as you started. This is the case.
I would like to mention some benefits that Microsoft 365 security center and Microsoft 365 defender have to protect the information that is hosted in your M365 tenant.
The new M365 security center it’s similar to having a SIEM (Security Information and Event Management) because it provides detection, analytics, and response to different events in your organization.
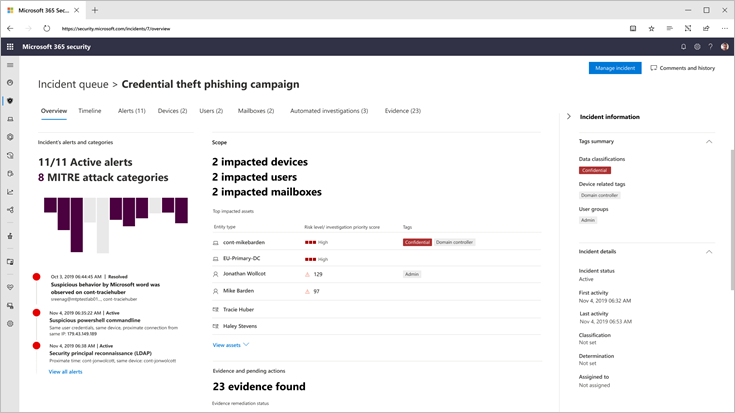
In the Microsoft 365 Security Center, you can get alerts and notifications about incidents regarding security breaches.
Incident dashboard
For example, when a computer is detected sending unusual traffic, using a different port to connect applications, sites, or protocols, or if a mailbox has received malicious content like malware, virus, or phishing.
The security defender solution, besides detecting all of these attacks, also gives some playbooks to mitigate the incident and make sure that the security breach is mitigated.
In the situation where a user receives malware, the incident dashboard contains all the information regarding the computer infected, IP address, location, user details, mailboxes, and the level of the risk.
In our experience as messaging administrators, we know that regardless of all the technologies or systems that we have to identify and block malware, sometimes some emails pass through. Therefore, we need to purge the delivered emails.
Now, Office 365 can identify those emails and delete them from the mailbox, even when they have been delivered; this is known as ZAP (Zero-Hour Auto Purge). Once Office 365 identifies this problem, an alert is triggered, and the alert is correlated with an incident. Therefore, in the dashboard, we can see an investigation related to this event.
Office 365 security can act immediately without any human intervention.
NOTE: It’s important to mention that ZAP does not work in a standalone exchange Online Protection (EOP) environment that protects an On-prem exchange environment.
Report of all emails that were zapped
You can see how many emails have been Zapped, how many mailboxes have been affected, and the status of the purge; that means you can double-check that no one has that malicious email in the mailbox.
In the Microsoft 365 security center, we can see not only the email threats but their kind of alert and their status; meaning, whether that alert has been mitigated or it is in process, and you can drill down to see all details.
Part of the information that contains the alerts, you can see the user name, title, department, computer name, IP address, location, and much more data that is helpful to the administrator to review if the user was trying to log in on different computers that might be at risk.
Details about a user with a high risk score
As you can see from this figure, we could identify how risky a user is. In this example, the user is a high priority to investigate due to all the different events that her account had. Also, we can see all the various activities the user had in previous days or weeks.
Office 365 provides a score where we can quickly identify the top users where you need to take action because they can be compromised.
With the advanced hunting tool, you are able to query different system applications from Office 365 such as Defender for Office 365, Defender for EndPoint, Defender for Identity, Cloud App Security (CAS), ATP, EOP, and then use a query to get information from all this telemetry.
Advance hunting console
The output of these queries can give us more valuable information about an incident. For example, if there is a situation where the user account is compromised, we are talking that these credentials were trying to be stolen. Therefore we can identify if those credentials were used to try to access other computers.
As we know, some attackers start with a typical user and then, they move laterally until they find an admin user that can have access to any domain controller in the network.
After reviewing all the different capabilities that Microsoft Office 365 security provides, the solution can automatically detect anomalies, gathering formation from other Office 365 security products; as I stated before, now Office 365 has a kind of SIEM product where the security team is able to control all the different security incidents.
Alert when credentials were stolen or theft
Furthermore, we can see alerts regarding inbox forwarding rules to external email addresses, this is a common method the attackers use to extract information from users or companies, M365 defender creates an alert to notify the administrator that there is a suspicious rule in a mailbox, and then, a security administrator must take a look at this configuration and start an investigation.
I am stunned that Microsoft now has this kind of solution working towards having a cloud environment more secure.
There is something that I always tell other skeptical engineers about migrating to the cloud, is that Office 365 and Microsoft Azure provide all the tools to make a secure environment.
There are many different tools, policies, services, products, and solutions that we can implement to have a secure environment in the cloud. For example, ATP (Azure Threat Protection) policies where we can configure antimalware, Anti-Spam policies, safe attachments, safe links, data loss prevention (DLP), information protection (AIP), cloud application security (CAS), and much more security configurations!
This topic has much more to cover; this is only scratching the surface. I want to continue talking about this in other posts.
A best practice is having an automate process to check the certificates expiration date, let’s say 60 days before their expiration, in that way proactively you can start the process to request a new certificates, besides of your company request process this article will help you identify those certificates with expiration date before 60 days.
First things first, lets identify where the certificates are located. You can use this cmdlet in PowerShell to see how many containers you have:
PS C:\> Get-ChildItem -Path Cert:\*
At this point we will focus on the LocalMachine because in your servers the most important are the machine certificates.
PS C:\> Get-ChildItem -Path Cert:\localmachine
As you can see in the list, we have the folder My, here we will find the certificates that we use for different applications, for example SQL, Exchange, Web, Skype for business, etc.
PS C:\> Get-ChildItem -Path Cert:\localmachine\my
And we get the list of certificates
You could use the Format-List option to see all details for these certificates as follow
As you can see in detail, we have the parameter NotAfter, this is the most important for us at this moment because it indicates the expiration date, so let’s get this information for these certificates.
From here you could automate this process and run every week and send the report to your team, also you can play with the different options to get only the expiration day, subject, Thumbprint, etc.
When you are ready to migrate to o365 and realize that your domain is not routable because more than 10 years ago when the domain was created they used .local extension, now a lot of years later you have to fix it.
Another scenario is when the company A acquires Company B and its time to unify everything, you have to change UPN also.
In my opinion is more common the first scenario, the second one is an option though.
The process to complete this setting is as follow:
In your domain controller go to Active Directory Domains and Trusts
Right click on Active Directory domains and trusts and select properties
The UPN suffixes window will appear and here we can add an
alternative Suffix as shown below:
Click on Add, then OK to register the alternative domain name.
Now we have another UPN suffix in our domain, we can change this domain name either to specific users or the whole domain users.
In this case lets change to a specific user. To do so, open Active Directory Users and Computers and find a user to change the UPN.
Right click and select properties, then click on Account tab and click on the domain name
As you can see on the figure, now we have available the new domain name, then select the new UPN suffix and click on OK.
Lets validate the change using PowerShell:
As you can see on the UPN attribute, we have now the correct
domain name.
So, if you need to change the same for all users in your
domain you can do in different ways.
Here you have an script to do so.
# How to change the UPN by Tony Gonzalez
#Lets create a variable to assign the users to affect.
#In case you can modify only few users, you can assign those
users to this variable
Everyone has used a lab environment either to test new technologies or to have a safe environment to test scripts or any other configuration, for some hypervisors like VMWare you need to have licenses to use networking devices like switches.
On Oracle VirtualBox you need to have advance networking and Linux skills to create some Virtual machines using Linux as Operating system and then create the routers and switches.
After you have this Linux computers and configure the Switch or router role then configure your internal network.
Another option is creating a Windows server with the NAT role installed, but again we need to create another computer that needs storage on the Hard drive, memory and CPU from the host, sometimes we don’t have enough resources for this.
Fortunately, we have another free option using Hyper-V and creating a NAT switch, in my experience using this option my environment is faster than using another computer as NAT server.
This is my virtual environment with three virtual computers connected to a default switch:
The complete design is as follow:
That means the host cannot provide internet access to the
Virtual machines because we are assigning a different IP range.
In order to solve this problem lets create a new virtual
switch and configure it as NAT switch.
To complete the configuration open PowerShell ISE as
administrator on the host computer.
We are creating the switch as shown below:
The next sped is create the virtual interface for this
network
And finally, we need to create the network
Make sure you connect the network interface of the Virtual machines (In my case VM1, VM2, VM3 and VM4) to the NAT Switch, immediately these computers will have internet access.
Now we can use Hyper-V as hypervisor on Widows 10 and its very
easy enable this feature. We have different ways to do this, the first its via
GUI and the second, of course using PowerShell.
To enable this feature using GUI lets follow these steps:
From Run menu type control to open control panel
In Control panel go to programs and features
then
Turn windows feature on or off
Check Hyper-V and click on Ok
Click on restart and the Hyper-V feature has been added.
Now lets add the same windows feature but using PowerShell, you need to open PowerShell as administrator, then run this line:
Is the first time using a Mac and I was wondering if I’m able to connect to exchange online using a computer with another operating system different as windows.
Once I got the package I started with the installation
Powershell has been installed successfully, then its moment to try the connection to exchange online
As you can see in the image, I got an error: “New-PSSession : This parameter set requires WSMan, and no support WSMan client library was found, or PowerShell quits with an unhandled exception“
Researching I figured out there is another way to install PowerShell using HomeBrew (https://brew.sh).
Input your admin password, then xcode will be installed.
HomeBrew installation will be completed, then now let’s install PowerShell.
paste the follow line: brew cask install powershell to start the installation
Input again the admin password
And PowerShell has been installed on my Mac! Now I will try to connect to Exchange online.
Use the follow command to save your o365 credentials in a variable: $UserCredential = Get-Credential
then save the session information in another variable called $Session: $Session = New-PSSession -ConfigurationName Microsoft.Exchange -ConnectionUri https://outlook.office365.com/powershell-liveid/ -Credential $UserCredential -Authentication Basic -AllowRedirection
As you can see, the error does not appear anymore! The next step is start the session using: Import-PSSession $Session -DisableNameChecking
We can see that PowerShell is importing all exchange online cmdlets on this computer. To confirm, let’s get all mailboxes in my tenant.
And that’s all! I hope this process helps to all Mac users.